
Real-Time ML: How to Remove Video Background and Audio Noise in Live Streams
A few weeks ago, I joined a video call from my desk. There were piles of clothes behind me, the TV was loudly playing YouTube videos, and my wife was talking with her family nearby. I clicked a single button in the meeting app, and instantly my background turned into a clean, blurred wall and all the noise disappeared. Nobody on the call heard a thing.
I have used that button a hundred times. But that day I stopped and asked myself: how does this actually work? It feels like magic, but it is not magic. It is machine learning running live, frame by frame, on my own laptop.
So I spent some time digging into it. This post is everything I learned. I will explain how a computer can erase your background and clean your audio in real time, show you some code you can actually run, and point you to the tools that do it for you. No heavy math, I promise. Just plain explanations.
Let me show you what we are talking about first. Drag the handle left and right to compare the raw camera frame with the cleaned-up one.


What "Real-Time ML" Really Means
Before we go deeper, let me clear up the words.
Machine learning is when a computer learns to do a task by looking at lots of examples, instead of being told every single rule by hand. To recognize a person in an image, nobody writes a rule like "if there is skin color here and hair there". Instead, you show a model thousands of photos of people, and it learns the pattern on its own.
Real-time means it happens fast enough that you do not notice the delay. For video, that usually means around 30 frames per second. So the model has to finish its work on each frame in about 33 milliseconds. That is the hard part. A model that takes 2 seconds per image is useless for a live call.
So "real-time ML" here means: a trained model that runs fast enough to process your camera and microphone live, while you are streaming.
There are two separate jobs we want to do:
- Video: figure out which pixels are you and which are background, then blur or replace the background.
- Audio: figure out which sounds are your voice and which are noise, then keep the voice and remove the noise.
They sound similar, but the techniques are different. Let me take them one at a time.
Part 1: Changing the Video Background
The core idea: segmentation
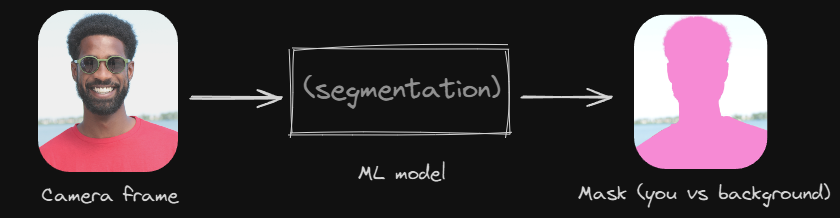
The whole trick comes down to one question the model answers for every single pixel: "Is this pixel part of the person, or part of the background?"
This is called image segmentation. More specifically, separating a person from everything else is often called selfie segmentation or person segmentation.
The model looks at the camera frame and produces something called a mask. A mask is just another image, the same size as your frame, but instead of colors it holds a number for each pixel: close to 1 means "this is the person", close to 0 means "this is the background".
Once you have the mask, the rest is simple image work:
- To blur the background: take the original frame, make a blurred copy, then use the mask to keep the sharp person from the original and the blurred pixels everywhere else.
- To replace the background: do the same, but instead of a blurred copy, use a beach photo, an office, or anything you like behind the person.
The machine learning part is only the mask. The blurring and replacing is plain old graphics that browsers and graphics cards have done for decades.
Doing it in the browser with MediaPipe
Google built a model called Selfie Segmentation and made it free to use. It is small, fast, and runs right in the browser using your graphics card. This is the same family of tech that powers background blur in Google Meet.
Here is a stripped-down example. It grabs your webcam, runs each frame through the model, and draws the result on a canvas with the background blurred. I have kept it simple so you can follow the flow, not memorize an API.
<video id="camera" autoplay playsinline></video>
<canvas id="output" width="640" height="480"></canvas>

<script type="module">
  import { SelfieSegmentation } from '@mediapipe/selfie_segmentation';

  const video = document.getElementById('camera');
  const canvas = document.getElementById('output');
  const context = canvas.getContext('2d');

  // 1. Load the model.
  const segmentation = new SelfieSegmentation({
    locateFile: (file) =>
      `https://cdn.jsdelivr.net/npm/@mediapipe/selfie_segmentation/${file}`
  });
  segmentation.setOptions({ modelSelection: 1 });

  // 2. Every time the model finishes a frame, draw the result.
  segmentation.onResults((results) => {
    context.save();
    context.clearRect(0, 0, canvas.width, canvas.height);

    // Draw the mask, then keep only the person from the camera on top of it.
    context.drawImage(results.segmentationMask, 0, 0, canvas.width, canvas.height);
    context.globalCompositeOperation = 'source-in';
    context.drawImage(results.image, 0, 0, canvas.width, canvas.height);

    // Put a blurred version of the camera behind the person.
    context.globalCompositeOperation = 'destination-over';
    context.filter = 'blur(12px)';
    context.drawImage(results.image, 0, 0, canvas.width, canvas.height);

    context.restore();
  });

  // 3. Start the camera and feed frames to the model, one after another.
  const stream = await navigator.mediaDevices.getUserMedia({ video: true });
  video.srcObject = stream;

  async function pump() {
    await segmentation.send({ image: video });
    requestAnimationFrame(pump);
  }
  video.onloadeddata = pump;
</script>
A few things worth pointing out:
requestAnimationFrameis what keeps this running live. It calls ourpumpfunction before every screen repaint, so we process frames as fast as the browser draws them.globalCompositeOperationis the canvas feature that does the masking.source-inmeans "only keep the new drawing where it overlaps what is already there". That is how we cut out the person.- The model runs on the GPU through WebGL, which is why a laptop can keep up at all.
If you want a slightly more capable option with extra features, Google's newer MediaPipe Tasks library has an ImageSegmenter that does the same job with a more modern API. Both are good. Selfie Segmentation is the simplest place to start.
Why the edges look bad sometimes
You have probably seen this on a call: someone raises a coffee cup and half of it disappears, or their hair flickers at the edges. That is the mask getting confused.
It happens because the model has to be small and fast to run live, so it is not perfect. Hair, glasses, thin objects, and busy backgrounds are the usual troublemakers. Better lighting and a plain wall behind you genuinely help, because they make the person-versus-background decision easier for the model.
This is the constant trade-off in real-time ML: a bigger, slower model would give cleaner edges, but it would not keep up with 30 frames a second. So the tools pick a model that is "good enough and fast", and accept the occasional flicker.
If you do not want to write code
Most of the time you do not need to build any of this. It already exists:
- Google Meet and Zoom have background blur and replacement built in.
- NVIDIA Broadcast uses your NVIDIA graphics card to do background removal (and noise removal, more on that below) for any app on your computer. You can watch their official demo on the NVIDIA Broadcast page.
- OBS Studio, the free streaming tool, has a Background Removal plugin that does exactly the segmentation we talked about, then lets you key out the background like a green screen, without owning a green screen.
Here is the background removal running live in the small demo I built while researching this. Hit play to watch the background switch between the original, a blur, and a replacement while the person stays put.
Part 2: Cleaning Up the Audio
Now the other half. Removing the keyboard clatter, the fan, the traffic, and my neighbor's drill, while keeping my voice clear.
The core idea: noise suppression
Just like video segmentation answers "is this pixel the person?", audio noise suppression answers a similar question for sound: "is this part of the sound a human voice, or is it noise?"
To understand how, it helps to know that any sound can be broken down into different frequencies, low rumbles, mid tones, high hisses. A human voice has a fairly recognizable pattern across those frequencies. A fan, a keyboard, or traffic has a different pattern.
The old way to remove noise was to write fixed rules: "the fan is always this steady low hum, so subtract it". That works for constant, predictable noise. It falls apart the moment the noise changes, like a sudden bark or a door slam.
The machine learning way is smarter. You train a model on thousands of clips of clean speech mixed with all kinds of noise. The model learns what speech looks like and what noise looks like, even noise it has never heard before. Then, live, it listens in tiny chunks (a few milliseconds each) and turns down the parts that are noise while keeping the parts that are voice.

The easiest win: just ask the browser
Here is something a lot of people do not know. If you build anything with the microphone on the web, the browser already has noise suppression built in, and you turn it on with a single line.
const stream = await navigator.mediaDevices.getUserMedia({
  audio: {
    noiseSuppression: true, // remove background noise
    echoCancellation: true, // remove echo from your speakers
    autoGainControl: true // even out how loud you are
  }
});
Behind those flags, the browser runs a real noise suppression algorithm (Chrome uses one from the WebRTC project). For most calls, this alone is enough. Before reaching for anything fancier, try this first.
Going further with RNNoise
If you want stronger, smarter noise removal, the most famous open-source option is RNNoise. It is a small neural network built specifically to clean up speech in real time, created by Jean-Marc Valin from the Xiph.org foundation (the people behind Ogg and Opus).
What makes RNNoise great for our purpose is that it is tiny and fast, so it can run live, even compiled to run inside a browser through WebAssembly. You can hear the author's own before/after samples on the RNNoise demo page. The difference is honestly impressive for something so small.
In the browser you would run it inside an AudioWorklet, which is the proper place to process audio without stutter, because it runs on a separate audio thread. The shape of it looks like this:
// main.js
const context = new AudioContext();
const stream = await navigator.mediaDevices.getUserMedia({ audio: true });
const source = context.createMediaStreamSource(stream);

// Load our noise-removal processor (which wraps the RNNoise WebAssembly module).
await context.audioWorklet.addModule('rnnoise-processor.js');
const denoiser = new AudioWorkletNode(context, 'rnnoise-processor');

// Pass the mic through the denoiser, then out to a clean output stream.
const destination = context.createMediaStreamDestination();
source.connect(denoiser).connect(destination);

// `destination.stream` is now your cleaned-up audio,
// ready to send into a call or a recording.
The rnnoise-processor.js part is where the actual model runs on each little chunk of audio. There are ready-made WebAssembly builds of RNNoise you can drop in (the Jitsi team maintains a popular one), so you do not have to compile C code yourself.
If you do not want to write code (again)
Same as the video side, you do not have to build any of this:
- NVIDIA Broadcast removes background noise from your mic and even from the people you are listening to, using your graphics card.
- Krisp is a popular app that sits between your microphone and any call app and strips out noise with ML. Many meeting tools now bundle similar tech.
- Google Meet has a "noise cancellation" toggle, and Zoom has background noise suppression settings built in.
Putting Both Together for a Live Stream
So how does a real live stream wire all this up? The pipeline looks like this:
Camera  -->  background segmentation  -->  clean video ─┐
                                                        ├>>  encoder -->  stream out
Mic     -->  noise suppression        -->  clean audio ─┘
Two independent processes, video and audio, each cleaned by its own model, then merged and sent out together. The merging and encoding is handled by your streaming software.
If you stream or record, the most common real setup is:
- OBS Studio as the hub.
- The Background Removal plugin for the video segmentation.
- NVIDIA Broadcast or Krisp as your microphone source for the audio cleanup.
Each tool does the ML; OBS just combines the cleaned streams. You do not write a line of code, and it all runs live.
Why Real-Time Is the Hard Part
I want to end Part 2 with the thing that surprised me most while researching this.
The models that remove backgrounds and noise are not the most accurate models out there. There are far better, far cleaner models for both jobs. But they are too slow for live use.
Everything here is a balancing act between three things:
- Quality: how clean is the result?
- Speed: can it finish a frame or audio chunk in a few milliseconds?
- Cost: how much CPU, GPU, or battery does it burn?
For a live stream you cannot have all three. The tools pick "fast and cheap enough", then make the quality as good as they can within that budget. That is why your background flickers a little and a sharp bark might sneak through. It is not a bug, it is the price of doing it live. When you process a recording afterwards, where speed does not matter, you can use the slow heavy models and get near-perfect results.
This same trade-off, quality versus speed versus cost, shows up everywhere in machine learning. Once you see it, you start noticing it in every "smart" feature you use.
Quick Tool Guide
| What you want | Easiest option | Build-it-yourself option |
|---|---|---|
| Blur / replace background on a call | Google Meet or Zoom built-in | MediaPipe Selfie Segmentation in the browser |
| Background removal for any app | NVIDIA Broadcast | OBS Background Removal plugin |
| Basic mic noise removal on the web | noiseSuppression: true in getUserMedia | N/A |
| Strong mic noise removal | Krisp or NVIDIA Broadcast | RNNoise compiled to WebAssembly, in an AudioWorklet |
| Full streaming setup | OBS + Background Removal + NVIDIA Broadcast/Krisp | Your own pipeline with the models above |
My honest advice: start from the left column. Most people never need the right column. I only went down the build-it-yourself path to understand it, and I am glad I did, but for actual calls I still just click the button.
Wrapping Up
So the magic button is not magic. For video, a small model decides which pixels are you and hands back a mask, and the rest is plain image editing. For audio, a small model decides which sounds are your voice and turns down the rest. Both run live because someone carefully picked models that are fast and cheap enough to keep up, and accepted that they will not be perfect.
The best part is how little you have to do to use any of it. One browser flag cleans your audio. One menu toggle blurs your background. And if you are curious, like I was, the open-source pieces are right there to take apart and learn from.
Next time my neighbor starts drilling, I will still click the button. But now I know what it is doing.
References
- MediaPipe Selfie Segmentation: Google's person segmentation model and docs.
- TensorFlow.js BodyPix: another in-browser person segmentation model.
- RNNoise: the open-source neural noise suppression library, with before/after audio samples.
- Jitsi RNNoise WebAssembly build: a ready-to-use browser build of RNNoise.
- MediaStream constraints (
noiseSuppression): the built-in browser audio cleanup flags. - AudioWorklet: how to process live audio off the main thread.
- NVIDIA Broadcast: GPU-based background and noise removal.
- OBS Background Removal plugin: segmentation-based background removal for OBS Studio.
- Krisp: ML noise cancellation app.
– Ramin ✌️
The sliding window is one of those techniques that looks clever once you see it and obvious once you understand it. Here is the plain version, with the kind of examples that actually made it click for me.
Feature flags are one of those tools that look trivial on the surface but change the way you think about deploying software. From a single constants file on my personal site to A/B testing nine design variants ...
An experience-driven reflection on software complexity, exploring how technical skills and business knowledge shape better system design.